Web2Publish on Linux
Introduction
This guide provides step-by-step instructions for installing the Web2Publish application on Linux.
Prerequisites
- PubServer: Version 4.7.0.x
- Knowledge requirements: Basic understanding of configuring PubServer (Autodeploy, deployment packages, Eclipse ISON plugin).
Installation Steps
1. Download the Package from Priint WebFTP
Depending on your PubServer version, download the corresponding Web2Publish package.
For example, for version 4.7.0, the folder is:
https://webftp.priint.com/#/priint_suite_4.7.0/publishing%20server%20add-on%20zips/latest/
Unzip the package — it contains all materials required for installation.
2. Install the Web2Publish Application (Spring Boot)
From the unzipped package, locate the JAR file (e.g., Web2Publish.4.7.x.jar).
Steps
-
Install the required Java SDK
For example, version 21 is required for Web2Publish 4.7.0. -
Upload the JAR file to your preferred directory on the server (rename if desired).
Example:/opt/pubserver/w2p/w2p.jar -
Add the Spring Boot configuration file (
application.propertiesorapplication.yml) to the same directory. A sample file (application_sample.properties) is included in the unzipped package.
-
Update the following custom configurations:
Property Description Example pubserver.baseUrlBase URL of the PubServer. The public domain is required here. https://pubserver.com/pubserver.admin.service.baseUrlBase URL of the AdminAPI API. It should be {YOUR_PUBSERVER_DOMAIN}/AdminAPI/api/. In case the Web2Publish and PubServer are hosted in the same server, the internal IP address or domain is allowed.https://pubserver.com/AdminAPI/api/pubserver.w2p.service.baseUrlBase URL of the Web2Publish Service API. In case the web2publish and PubServer are hosted in the same server, the internal IP address or domain is allowed. https://pubserver.com/w2p-service/api/pubserver.w2p.appIdThe app ID configured in the PubServer AuthService for authentication. web2publishapp.pathThe application path (must be /w2p)./w2p -
Review and update the following Spring Boot configurations based on your requirements:
Property Description Example spring.servlet.multipart.max-file-sizeMaximum allowed size for a single uploaded file when handling multipart/form-data requests (used for Media Asset uploads). 20MBspring.servlet.multipart.max-request-sizeMaximum allowed size of the entire multipart HTTP request, including all files and form data. 500MBserver.portTCP port on which the Spring Boot application listens for incoming HTTP requests. 8688management.endpoints.web.exposure.includeSpecifies which Spring Boot Actuator endpoints are exposed over HTTP. Should not be changed, as this is required to display application information in PubServer Admin. health,infomanagement.endpoints.web.base-pathBase URL path under which all Spring Boot Actuator endpoints are exposed. Should not be changed, as this is required to display application information in PubServer Admin. /w2p/management.endpoints.web.path-mapping.healthCustom URL path for the Actuator health endpoint. Should not be changed, as this is required to display application health information in PubServer Admin. healthzmanagement.endpoints.web.path-mapping.infoCustom URL path for the Actuator info endpoint. Should not be changed, as this is required to display application information in PubServer Admin. infozserver.forward-headers-strategyDefines how Spring Boot processes forwarded headers (X-Forwarded-*, Forwarded) when running behind a reverse proxy or load balancer. Should not be changed, as this setting is required by the framework to correctly resolve the original request scheme, host, and port. framework
-
Configure the systemd service to run the application
Create a service file
/etc/systemd/system/priint-w2p.servicewith the following content:[Unit]
Description=Web2Publish Application
[Service]
WorkingDirectory=/opt/pubserver/w2p
ExecStart=/usr/lib/jvm/zulu21/bin/java -jar /opt/pubserver/w2p/w2p.jar -Dspring.config.location=file:///opt/pubserver/w2p/application.properties
Restart=always
[Install]
WantedBy=multi-user.targetThen run:
sudo systemctl daemon-reload           # Reload systemd to detect the new service
sudo systemctl enable w2p              # Enable auto-start on boot
sudo systemctl start w2p               # Start the service
sudo systemctl status w2p # Verify service status -
Configure SSL
The application must always be configured with SSL to ensure secure communication.
There are two supported deployment approaches:
a. Recommended Approach: Using a Reverse Proxy
Using a reverse proxy is the standard and recommended deployment model.
In this setup:
- SSL is terminated and managed at the reverse proxy layer
- The application runs behind the proxy over internal HTTP
- Certificate management is centralized and simplified
- Security, scalability, and operational control are improved
Follow the next step (Configure Reverse Proxy) to configure SSL with a reverse proxy.
b. Alternative Approach (Not Recommended): Without Reverse Proxy
If you cannot use a reverse proxy due to infrastructure constraints, you may run the application without it.
However, this approach is not recommended for production environments, because:
- SSL must be managed directly in the application
- Certificate handling becomes more complex
- Less flexibility for scaling and routing
If you still need this setup, follow this guide: Setup without Reverse Proxy
- Configure the Reverse Proxy
Refer to this guideline to determine whether a reverse proxy needs to be configured for your environment.
3. Install the Web2Publish Service (PubServer Plugin)
In order for the application to work properly, install the Web2Publish Service.
You can find it in the unzipped package as a WAR file, for example:
Web2PublishService-4.7.0.x.war
Because it’s a PubServer plugin:
- You can install it via the Payara Admin Console, or
- Place it in the PubServer
autodeploy(hot-deploy) folder.
Note:
The context root should bew2p-service.
If you change it, make sure to update the corresponding Spring Boot configuration (pubserver.w2p.service.baseUrl).
4. Update the PubServer AuthService Configuration
To enable PubServer AuthService as the authentication provider for the application:
-
Locate the configuration file:
[path_to_your_domain_folder]/config/AuthService/config.xml
(for example:/opt/pubserver/glassfish/payara6/glassfish/domains/pubserver/config/AuthService/config.xml) -
Add a new application entry for Web2Publish:
<authService>
    <apps>
        <app name="priint:w2p" id="web2publish" visible="true">
            <uri>[W2P_HOME_PAGE]/auth/callback?sessionId={sessionId}</uri>
            <sessionCookieName>w2pSessionId</sessionCookieName>
        </app>
    </apps>
</authService>
Note: Please replace
[DATA-W2P_HOME_PAGE]with your server information, such as:https://priintsuite.com/w2p
- If the file doesn’t exist, follow this guide to create it.
5. Add and Update the ISON Configuration File
All features of the Web2Publish application are configurable through an ISON configuration file, which can be managed in PubServer using the ISON plugin.
Please refer to the sample file and the full explanation of all configuration options here: Sample Configuration
Then, update the configuration according to your specific requirements.
If you encounter any issues during setup, please contact our support team at support@priint.com.
6. Update the Web2Publish Preference
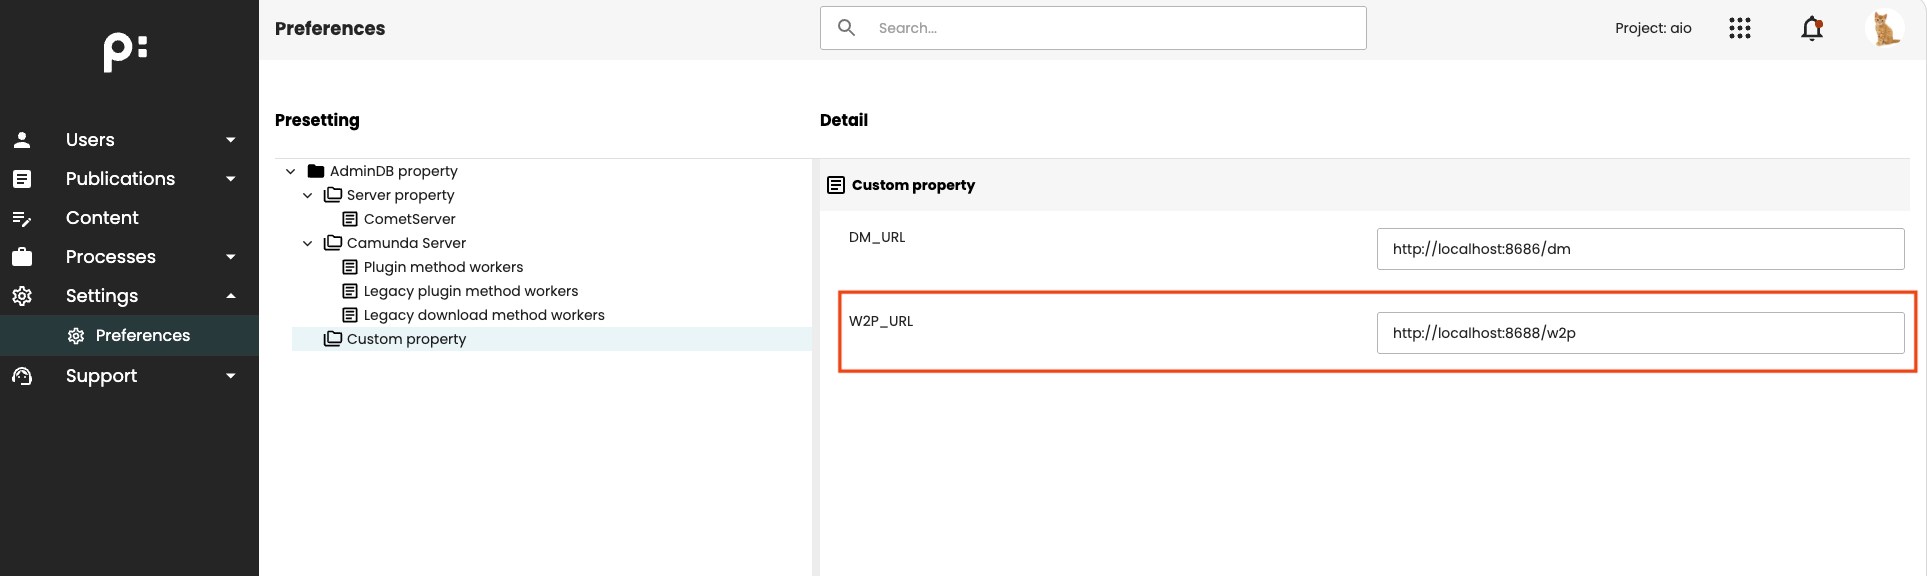
After installing the Web2Publish Service plugin in the PubServer, a new preference property is added. Verify that this property is configured correctly for your environment.
The property is named W2P_URL and is located under the Custom Property node. Its value must be the URL of your Web2Publish application. The URL must be accessible from the PubServer.
This URL is used by the PubServer to retrieve the status and version information of the Web2Publish application, which are displayed in the Application Status section of the Admin UI.
For more information, see Application Status in AdminUI.